Pictures, Tech Tips and
Advice from our installation of a
Procharger Stage II Intercooled Supercharger system on a C5 Corvette.
Please call us for more information
about any picture.
Superchargers
4
Less
Call for prices!
PH. 318-286-9169
The information given below
is only intended to be a supplement to the instructions
that Procharger provides with this supercharger system. We encourage our
customers to
always read the Owners Manual that Procharger provides with their system.
Go Here for Dyno Sheet and Video
| Join us we install the
Procharger Stage II Intercooled supercharger system on our 2003 Z06 Corvette. We previously
had the original Procharger HO Intercooled kit on this car. The HO kit
did a really good job for the 47,000 miles that we put on it and it will
keep on doing a good job for it's new owner.
Update 6-19-09: The Stage II system now has over 44,000 miles on
it and the car has over 101,000 supercharged miles on it with no damage to the engine
or drive train. Now let's discuss the improvements in the new Stage II kit. 1. It has a new thicker bracket which shows off more of the blower. 2. The new system has 3" tubing going to the new thicker twin intercoolers (4.5" instead the old 3.5" thick ones) The old HO kit had 2.5" tubing. 3. The new kit has a larger top mounted air filter that can be easily serviced and it flows better. The new filter shouldn't have to be cleaned as regular. The old system needed a air filter cleaning every 6,000 to 8,000 miles. The old kit had the air filter incorporated into the fan shroud that came with the kit. The biggest problem with the old air filter setup was servicing the filter, it took over an hour for the filter to be removed and replaced from the bottom side of the car. 4. The new Stage II system utilizes the stock fans, which are much quieter than the single large fan used on the old HO system. I think that the original fans cool better also. 5. The new system has better belt wrap on the supercharger pulley to reduce the chance of belt slippage and does so with 2 less idlers than the old system. 6. With the new system the drain plug for the supercharger oil is accessible, on the old system it was not possible to get to the drain plug without removing the supercharger. Procharger included a syringe with tubing on it so that the oil could be sucked out from the top on the old HO kit. 7. The blower is much easier to remove if you have to change a thermostat or do other service to the car. The supercharger can be removed without having get under the car and it can be done in about 15 to 20 minutes. 8. Ground clearance for the intercooler tubes is greater on the Stage II system. Let's now talk about efficiency. The new tubing and intercoolers on this Stage II system have really made this system efficient. This system makes over 6 psi with a huge 4.75 inch diameter pulley, where the old HO kit used a 4.25 inch pulley to make 6 psi. If you were to put a 4.25" pulley on this new kit, it would probably make 11+ psi!!! If you have followed our past
installation of the HO Intercooled system, you may want to skip the part
about pinning the crankshaft. Nothing is different about pinning the
harmonic balancer to the crankshaft. |
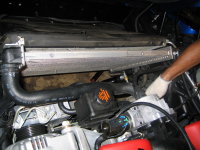
1. System received and inspected.
Everything looks good and is accounted for.

"Go here for a larger view"
|
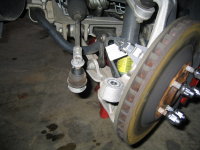
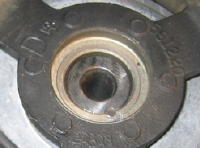
2. Pinning the harmonic balancer to the
Crankshaft. The harmonic balancer on the LS1 engine is not keyed to the
crankshaft, so it must be pinned to keep it from shifting with the added torque
load of the supercharger. ATI and Vortech both supply the tools to accomplish
this task. |
|
|
|
|
|
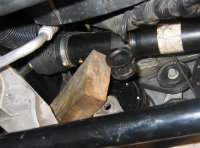
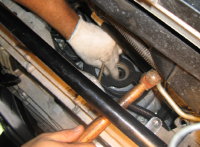
The bolt that holds the harmonic balancer on, has a locking compound on it. The engine will spin while trying to loosen the bolt. We stopped this from happening by sticking a screw driver through one of the vent holes in the back of the bell housing and into the teeth of the flywheel. |
|
|
|
|
|
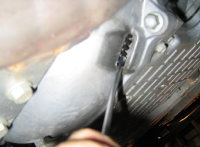
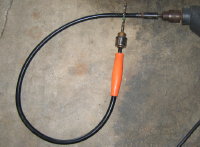
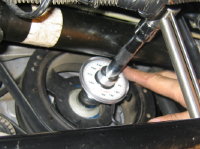
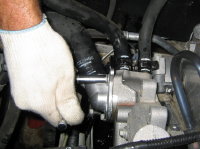
We removed the factory crankshaft bolt and then installed the provided ATI drill guide/alignment tool onto the end of the crankshaft. Clearance between the radiator and drilling area is very tight, so we used a flexible drill attachment (see picture above) on our drill to give us more room to work. We also wrapped our drill bit with tape at the pre-measured depth that ATI recommended, to give us a stopping point for our drilling depth. We checked the depth of the pin hole before we tapped the pin into place, it would be a real problem if we tapped the pin into a hole that was a millimeter to shallow. |
|
|
|
|
|
We cleaned the old thread locking compound off of the original crankshaft bolt and reapplied LockTite® The original bolt was then reinstalled, torqued to 40lbs and then turned another 120 degrees. |
|
|
|
|
|
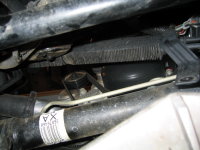
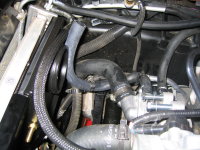
3. Relocation of the coolant recovery hose: The coolant recovery hose must be relocated to make room for the blower. ATI provides hose menders and a length of heater hose to relocate the hose. We cut the hose as instructed, then loosened the hose at the engine and rotated it downward. We cut the new piece of hose to the required length and spliced it to the original hose ends. 4. Installation of 160 degree thermostat (optional): ATI recommends that you run a 160 degree thermostat. The problem with the thermostat recommendation, is that ATI tells you this after you have installed the blower (if you are following the order that the manual is written) The thermostat cannot be reached with the blower installed. If you want to change the thermostat you had better do it now. |
Call us if you have any questions about any picture(s).
"Go Here" to see more of our installations.
Call: 318-286-9169
Superchargers
4
Less
1110 C C Sandidge Road
Elm Grove, LA 71051